


- How do I expire my survey?
- How do I get a survey link to put on my website
or to send out via my own email? - Can I edit an active survey?
- The edit button is greyed out, why can’t I edit my
survey?
Question Manager - How do I add a “thank you” message to my survey?
- How do I add a header/footer to my survey?
- Can I insert a graphic in the footer of my survey?
- Can I insert a graphic as part of a survey question?
- Can I use audio or video files in my survey?
- How do I show my participants only questions that apply to them in the survey?
- How do I copy a survey?
- What is the difference between rating and ranking questions?
- Why are there extra line breaks in my survey question?
- How can I change the contact information found in the “thank you” message of my survey?
Look and Feel - How do I change the font of my survey?
- How do I change the colors in my survey?
- How do I upload a logo to my survey?
Distribution Manager - I have an Excel file with Email addresses, how can I use it to send out my surveys via Email?
- Why doesn’t my list appear in the dropdown when trying to use mail merge in my survey email invitation?
- How do I use mail merge?
- Why aren’t my invitations being delivered to my recipients’ inboxes?
- How do I reschedule my email invitations?
- How do I send invitations to a few people and NOT the entire list?
- Can I send more than one email invite to the same email address?
- How do I send reminders to people I’ve already invited to participate in my survey?
- I accidentally sent out real invitations to my survey when I meant to send out test invites. Now I need to edit my survey but I’m unable to do so. What should I do?
- How can I change the name and email address found in my email invitation?
Report Manager - How do I create a report in the system that shows the responses of only those people who answered a question with a given answer? (i.e., only those people who answered that they live in California).
- How do I use reports I’ve created in the system in a PowerPoint presentation?
- How do I share reports with others?
Account Administration - What is the difference between an anonymous and a confidential survey?
- Why is the system telling me that I have exceeded my survey limit?
- Why can’t I find an old survey in my account?
- My survey audience has “white-listed” my organization, but not Zarca. How can I send emails using Zarca and get through the SPAM filters?
Survey Manager
-
How do I expire my survey?
On the Survey Manager main page, select the survey you wish to expire and click on the Edit button on the toolbar above, select Expiry Rules from the drop down.Select the Expire the survey now option to immediately expire your survey, and click Save.
Select the Advanced Expiry Rules option if you wish to expire your survey at some predetermined point in future.
-
How do I get a survey link to put on my website or to send out via my own email?
Go to Distribution Manager main page, select the survey and click Manage Public URLs.Click New on this page and provide a description for this Public survey link and click Generate URL.
You may use this link on your web page or to send invitations through your own email.
-
Can I edit an active survey?
Yes. You can edit the question text and answer option text in an active survey. To make text changes to your active survey, simply hover your mouse over the question or answer text and click to edit.Note: To help preserve the integrity of your data, structural changes are not allowed once a survey becomes active.
Structural changes include adding or deleting questions, adding or deleting answer options, or changing question types, add branching or remove piping.
-
The edit button is greyed out, why can’t I edit my survey?
Edit is disabled for expired surveys. In order to edit an expired survey, you may either:a. Copy the survey and edit the copied version, Or
b. "Un-expire" the survey by accessing the Expiry Rules section and enter a future date for expiration.
Question Manager
-
How do I add a “thank you” message to my survey?
- From the Question Manager page, click the Survey Settings tab.
- Select Thank You Page Details from the left panel.
- Select Yes for Display A Thank You Message option.
- Enter your content in the field below.
This Thank you message will be seen by all participants upon clicking SUBMIT in the survey.
-
How do I add a header/footer to my survey?
- From the Question Manager page, click the Survey Settings tab.
- Select Survey Add-ons from the left panel.
- Select Yes for "Add Header Message" and/or "Add Footer Message" options.
- Enter your header/footer content in the text boxes.
- The header/footer content will be seen on the top and/or bottom of every survey page.
-
Can I insert a graphic in the footer of my survey?
Yes. You can insert a graphic in the footer of your survey using HTML code. The graphic will need to be hosted on the internet in order for you to accomplish this. Please contact Support for more details.
-
Can I insert a graphic as part of a survey question?
Yes. You can insert graphics in your survey questions as well as answer options. Beneath the Question Text Box, there is a link, Images and Multimedia. Click this link; you would be prompted to save the question. Click OK.
To add an image, expand Add Images, click on the Upload button and locate the file on your computer. You can also choose the image position of left, right or center of the question.
If you would like the image to redirect the participant to another page when the person clicks on it, enter in the URL of that page under Link Image to (URL). Content that you want to appear beneath the image can be entered in the field called Caption.
-
Can I use audio or video files in my survey?
Yes. Audio and video files can be used in your survey. If your account is equipped with this feature. Beneath the Question Text Box, there is a link, Images and Multimedia. Click this link; you would be prompted to save the question. Click OK.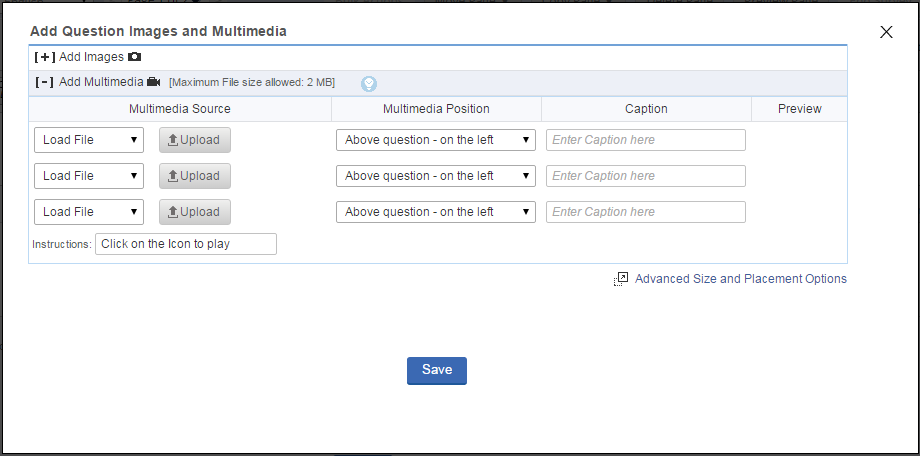
To add an audio/video file, expand Add Multimedia, click on the Upload button and locate the file on your computer. You can also choose the file position to be above or below the question. Content that you want to appear beneath the audio/video file should be entered in the Caption field.
-
How do I show my participants only questions that apply to them in the survey?
You may use Branching feature to direct survey respondents to different questions based on how they answer certain questions in your survey.Using this feature, the survey creator can guide each participant along a 'path' of specific questions based on answers that the participant provides to certain key questions. The participant can be routed around questions that do not apply to them. They will see only those questions that are pertinent to their situation - thereby increasing the accuracy of data and ensuring the survey experience is the shortest possible for each participant.
Example:
Page 2 – Question #9: Is there a computer in your home that your child/children can use to access the internet?SPECIAL NOTE:
If Yes is selected, the respondent will be automatically directed to Page 3 – where follow-up questions are asked about that computer.
If No is selected, the respondent will skip Page 3 and be automatically directed to Page 4 – where questions are asked about other sources for accessing the internet.
- Branching is a ‘page-to-page dynamic’ feature. This means that you are not branching from question to question – but from page to page.
- You cannot branch from one question to another question on the same page.
- You cannot branch to a previous page or to a page that is not yet created.
- You cannot have more than one branching question on a single page.
- NOTE: Question numbers will not be displayed in surveys that contain Branching, to prevent possible participant confusion.
-
How do I copy a survey?
- On the Survey Manager main page, select the survey and click Make a Copy.
- Select a option "In This Account" or "Into Different Account".
- A message will appear indicating that the copied survey is available and also the folder it can be found in.
-
What is the difference between rating and ranking questions?
A ranking question asks the participant to place in order of preference each item listed. An example of this might be to rank from 1 to 3 (where 1 is the best), their favourite ice cream flavour from a list provided.
A rating question is similar to radio button or drop down question where the participant is asked to select one option that represents a preference. However, in addition to providing answer options, you can also assign a numeric value. An example of a rating question might be to assign a grade from A through F to the question "What grade would you give our customer service staff?" When you review the Bar Graph report for this question, you will see not only the number of times each grade was selected by participants, but also a weighted score that represents the quantitative value of the grades selected. So if you entered the grades A, B, C, F and corresponding numbers of 4, 3, 2 and 1 respectively, then based on the number of times A, B, C or F were selected, the system will compute the numeric score to provide a weighted score for this question.
Sample Ranking Question:
Sample Rating Question:
-
Why are there extra line breaks in my survey question?
Most often the presence of these line breaks are a result of copying/pasting from Microsoft Word documents directly into the system. When you do so, you not only copy the text of your questions, but also some special characters (HTML code) that you do not see while copying and pasting into the system.In order to resolve this issue, simply click the Source button in the Question text box and paste the question text there.
You may also, copy/paste your text from MS Word into Notepad, and then copy/paste from Notepad into the system. This will remove all of the special characters from your text and remove the unwanted spaces in your questions.
-
How can I change the contact information found in the “thank you” message of my survey?
- From the Question Manager page, click the Survey Settings tab.
- Select Thank You Page Details from the left panel.
- Select Yes for Display A Thank You Message option.
- Enter your updated contact information in the field below.
This content will be seen by all participants upon clicking SUBMIT button in the survey.
Look and Feel
-
How do I change the font of my survey?
From the Question Manager page, select the Look and Feel tab.
You may change the Font Type and Font Size towards the end of the page, under Choose Text & Font Format. Changes made via this interface will affect all questions and answers in the survey. If changes to font styles are made while creating a question, those changes will remain intact.
-
How do I change the colors in my survey?
Click on the Look And Feel tab from the Question Manager Tab. Towards the end of the page, expand the Choose Color Palette option and select the desired colors. Alternatively, you can choose a color template from the system templates, also available on the same page.
-
How do I upload a logo to my survey?
In Look And Feel page, select the Show Logo option under Choose Logo. You may upload a new logo, fetch an image from a URL or copy another survey's logo, by selecting an option from the drop down here. Click the Save button at the bottom of the page to save your work.
Distribution Manager
-
I have an Excel file with Email addresses, how can I use it to send out my surveys via Email?
You have two options: Either send it directly from the Excel file OR Create a list in the system and send it from your newly created list. (We recommend the latter)
If you elect to send your surveys via the Excel file, make sure all email addresses are in the first column of your spreadsheet, and the file is saved as either an Excel or .CSV file. If you would like to build a list in Zarca, your spreadsheet must also contain at least one attribute column (an attribute is any other information tied to each Email address, such as name, date of birth, city, etc). If no attribute exists, simply copy the email address column twice and give the header of the new column a different name. To create a list, follow these steps:
Click on the Contact Manager button under the Distribution Manager. Click New and select List from the drop down.
- Choose a name for your list. Be sure to make it recognizable so that you select the correct list when sending out your invitations. Click Next.
- Define additional attributes. These attributes include any information in your spreadsheet that is not the Email address column. So, if you have a column for First Name and another column for Last Name, you have 2 additional attributes. Select (2) columns from the predefined commonly used fields or select Add Custom Fields, and type the name of your attribute columns. Match the attribute type by selecting the appropriate drop down column. If a match does not exist, select OTHER. If you do not have any other attributes other than email address, give the attribute a placeholder name such as EList. Click Next.
- Define Source. In the dropdown menu, choose Import from File. Click Browse and locate the file on your computer. Click Next.
- Populate List. If your spreadsheet file has headers (such as the word First Name above all of the names in a column) then check the box to Ignore field heading (First line of your file.) (Also, note the option that allows you to upload duplicates in your list). Next, match the columns on the left with the corresponding dropdown box to the right. When you are finished, click Done.
-
Why doesn’t my list appear in the dropdown when trying to use mail merge in my survey email invitation?
If you have built your list in the Contact Manager and it is not showing up as a list you can choose from, it is likely that your list was created using Unique IDs rather than Email addresses. Please recreate your list in the Contact Manager and select Email Address in Step 1, as indicated below.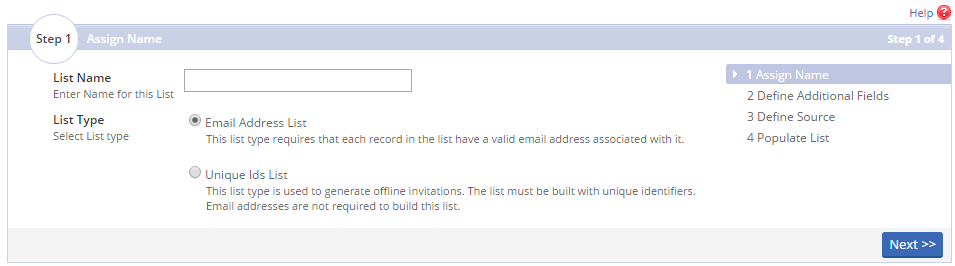
-
How do I use mail merge?
- Select the survey and click Publish Survey/Send Invitations under Distribution Manager, select any of the Publish via Email options and click Continue.
- On Step 2d, select the Add mail merge value in email content check box, you will have the option to select attributes that you would like to merge into your invite.
- When you select an attribute, the code for that attribute will appear to the right. Copy and paste the entire code directly into the body of your invite below - exactly where you would like it to appear. Please be careful to copy the entire code.
You have the ability to mail merge multiple attributes into your invitation (i.e., First Name, Last Name, etc.). Go to Step 5 and map the Mail Merge values.
To ensure that mail merge has been implemented correctly, go to Step 7 and preview the email message.
-
Why aren’t my invitations being delivered to my recipients’ inboxes?
There are several reasons why your invitations may not be making it to your recipients' inboxes.
Common reasons include: the person's inbox is full, their email address was typed incorrectly, their mail server does not accept HTML emails, or the recipients' server was inaccessible. Emails can also get caught in SPAM filters if they resemble a piece of SPAM mail, so it is important to customize the subject line and body of your invitation message. For more information on this topic, please contact Support.
-
How do I reschedule my email invitations?
If you have scheduled invitations that you would like to reschedule, you must delete your scheduled invitations in the Track Survey first. To do this, select your survey and click on the Track Survey button under Distribution Manager. Click the Delivery Status filter under Original Invitation and select Email Scheduled.
Check the box in the upper left corner of the table to select all scheduled invites on that page, and click delete. You are able to delete 100 invites at a time. (Please be careful not to delete any invitations that have already been sent because this will also deactivate that individual's survey link, and delete their survey response if they have already taken the survey.)
-
How do I send invitations to a few people and NOT the entire list?
In Step 3 of the Publish Survey/Send Invitations process, choose From a List as the source of your email invite list. In the dropdown that appears beneath, choose the sample size as Selected Email Addresses. Identify the email addresses on the left and click Add to put them in the box to the right. The box on the right will contain the email addresses that will receive survey invitations.
-
Can I send more than one email invite to the same email address?
Yes, you can send multiple email invitations to the same email address. To do so, when building your List, make sure to allow for duplicate email addresses to be loaded.
-
How do I send reminders to people I’ve already invited to participate in my survey?
Intelligent Reminders are available only in Unique URL (Single-Use Link) invitations. Under Distribution Manager, select your survey and then click Send Reminder. If you would like to send reminders to only selected Email addresses, check the box to the left of each address and click Send/Schedule Reminder. If you would like to remind everyone, click Send/Schedule Reminder to All. Click OK on the pop-up prompt.- Follow the wizard to send your Reminders immediately or schedule them for later.
-
I accidentally sent out real invitations to my survey when I meant to send out test invites. Now I need to edit my survey but I’m unable to do so. What should I do?
If the responses you have received are not important for your dataset (for example, the respondents were only reviewing your survey formatting but you aren't interested in their actual answers) then you can delete their responses to bring your survey back in Edit mode. To delete the responses, follow the steps below:- In the Distribution Manager tab, select your survey and click Track Survey.
- Here you may select all the email addresses and click delete. This would delete the invitations as well as the responses. Please note, this action cannot be undone.
-
How can I change the name and email address found in my email invitation?
- Under Distribution Manager tab, select your survey and click Publish Survey/Send Invitations.
- Select any of the Publish via Email options and click Continue. Select the Email Message and click Select & Customize Email.
- In the next step you will see fields Sender Name and Sender Email Address. The text that you type into these fields will appear in the email invitation that is sent.
Report Manager
-
How do I create a report in the system that shows the responses of only those people who answered a question with a given answer? (i.e., only those people who answered that they live in California).
This type of report is called a Conditional Report. You can create this report by selecting your survey in the Report Manager tab, and clicking on the Conditional button.- Select the conditional question you would like to use (i.e., “What state do you live in?”).
- Select the condition (i.e., “IS” or “IS NOT”).
- Select the answer to the conditional question (i.e., “California”).
- Click Next, and select the questions you would like to be included in your report.
- Click Generate Report.
*Note – you can add up to 15 conditions in one Conditional Report.
-
How do I use reports I’ve created in the system in a PowerPoint presentation?
You can export reports for individual questions using the VIEW CHART icon above the Basic/Advanced Charting icon.On clicking on this icon, a pop-up window will open that will allow you to customize your Advanced Chart, as well as print a hardcopy of that report or save it as a .PNG file.
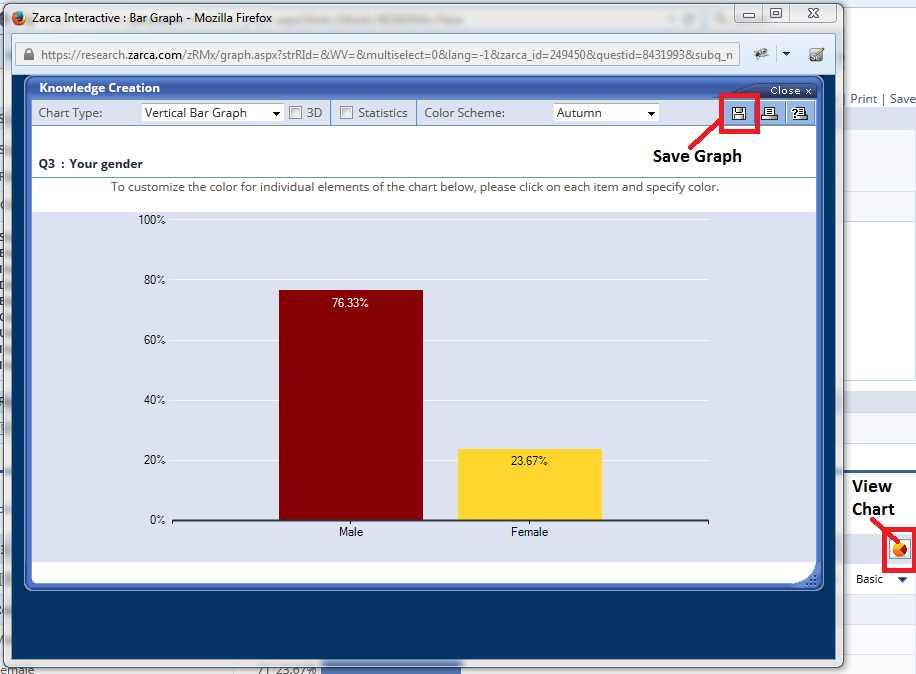
Apart from this you can also export all questions with advanced chart settings to PPT file by clicking on Export button with PowerPoint icon at the bottom of the report page.
-
How do I share reports with others?
You can email any type of report you create in the system to others. After you have finished creating your report, scroll to the bottom of the page and click Send via Email button. You will have the opportunity to title your report, insert a name to be included as the sender, insert an email address to be included as the sender, the subject of the email, and the email addresses to which you would like to send the report (separated by commas). The body of the email is fully customizable, except for what appears between the arrows (<-----Place this line where you wish the saved report link to appear----->). If you delete or modify this placeholder line, the link to your reports will not work.
At the bottom of the report, you can indicate the date on which the report will expire. If the person you send it to tries to access the report after this date, they will receive a message that the report is no longer active.
Account Administration
-
What is the difference between an anonymous and a confidential survey?
An anonymous survey is one in which all of your participants' identifying information is stripped from their response. As the Survey Creator, you will not be able to see who has or has not responded to your survey, and you will not be able to tell which response belongs to which participant. A confidential survey is one in which the Survey Creator knows who responded and how each participant responded, but the survey creator agrees to only report their data in aggregate form.
- Why is the system telling me that I have exceeded my survey limit?
If your subscription does not limit you to a specified number of surveys, then you can create an unlimited number of surveys in your account.However, there may be a limit currently set within your specific account that the Account Administrator must increase. This change can be made by following these steps:
- On the Home Tab, click the drop down besides your name in the top right corner of the screen, and click Settings.
- Select New Requests from the left panel and click Request More link besides Surveys.
- Enter the number of additional surveys you would like.
- Click Submit.
If your account does not include unlimited surveys and you would like to purchase additional surveys, please contact Support for details.
-
Why can’t I find an old survey in my account?
If you are using a sub-account, the Account Administrator at your organization has the ability to set permissions as to what surveys your sub-account can access. If your Administrator has changed or removed some of your survey permissions, then you may not be able to see the old surveys in your account. Please check with your Account Administrator if you need access to old surveys that you believe should still be in your account.Alternatively, your account may have been reorganized since you last used the system. Please check each of the folders on the left in the Survey Manager tab to see if your survey has been placed in a different folder.
-
My survey audience has “white-listed” my organization, but not Zarca. How can I send emails
using Zarca and get through the SPAM filters?
Zarca has a useful option called Email Relay Settings which can route your survey emails through your own mail server to your participants' inboxes. This feature is available in Administrator's account; click the drop down besides your name in the top right corner of the screen, and click Settings.Email Relay Settings is an option in the left pane.
We recommend that the Email Administrator at your organization set up an account specifically for the purpose of relaying these emails, and that person should be able to provide you with the information requested in the Email Relay section. If you have additional questions, please feel free to contact Support.